Important
This section applies to SCI 1.1 only
Audio recording in SCICompanion
If you have a microphone attached to your computer, you can record audio directly into message resources in SCICompanion.
Recording format
There are four options for recording format: The combinations of 11025Hz or 22050Hz, and 8-bit or 16-bit. Sierra’s games generally used 22050Hz 8-bit audio for voice acting.
SCICompanion will record in 16-bit audio, and then reduce the bit depth if you have chosen to record in 8-bit. Even if you only want 8-bit audio, recording in 16-bit gives the most options for re-processing the sound. The lip-sync data generator also works best with 16-bit source material.
When you record in SCICompanion, a 16-bit audio negative (to borrow a photography term) is kept around in the form a .wav file. This allows you to reprocess the source audio with different settings.
Audio processing
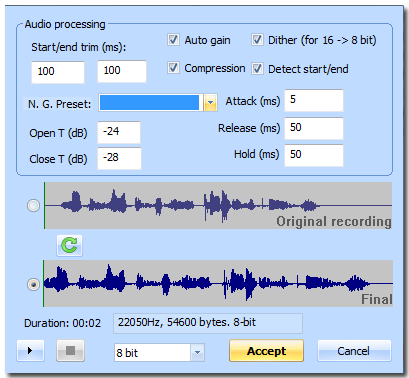
The following options are available for audio processing. By default, SCICompanion uses those defined in the Tools->Audio Preferences dialog, but they are adjustable after the fact per recording.
- Start/end trim. This removes the beginning and end of the original recording, in case you always have button clicks that interfere with the recording.
- Audio gain. This amplifies the sound so that it fills the maximum possible dynamic range. This can help ensure your sound levels are consistent throughout the game, and will also help reduce noise in 8-bit audio.
- Compression. This compresses the signal, making quiet sounds louder and loud sounds more quiet. This is important to even out the levels in speech.
- Dither. This is used when we reduce the bit-depth to 8 bits. It creates a higher fidelity sound at the expense of some background noise. For speech, the effect is generally very subtle.
- Detect start/end. This removes the beginning and end of the recording where it falls below the noise gate threshold.
- Noise gate. This cuts off sound that falls below a certain loudness threshold. Some form on noise gate is fairly essential, and there are a number of different settings to choose from based on your source material.
It’s important to note that 8-bit audio has a relatively high noise floor. This will be very apparent in soft passages, where the noise level will be high compared to the actual audio date. This is why a noise gate is so important for 8-bit audio.
Edit Audio dialog

The Edit Audio dialog can be invoked when there is an audio negative present for the sound. It lets you compare the original recording and final result, and reprocess the recording with different settings to get the desired result. You can also switch between 8 and 16-bit to hear the difference.
Level clipping
When the recorded or final audio has hit the dynamic range limit, generally the audio will sound distorted. This is indicated by red warning text indicating the sound is being clipped. In the message editor, this is also shown with a red icon next to the message entry with clipped sound. If you’re getting this consistently, you should adjust your microphone level, or speak a different distance from the microphone.